
Table of Contents
この記事で学習できること
- JPEGカメラ、データロガーシールドArduino UNO R3に接続し、一定周期で撮影したJPEG画像をデータロガーシールドのSDカードに保存する方法を学習します。
撮影とJPEG画像の保存
- Arduinoにjpegカメラを接続してSDカードに画像を保存するまでを[ArduinoでJPEGカメラ画像をSDカードに保存する方法]でまとめました。このスケッチは撮影を一回だけ行い画像をSDカードに保存しています。
- ①②③を追加してJPEGカメラが一定間隔で撮影した画像データをSDカードに書き込む機能を加えます。
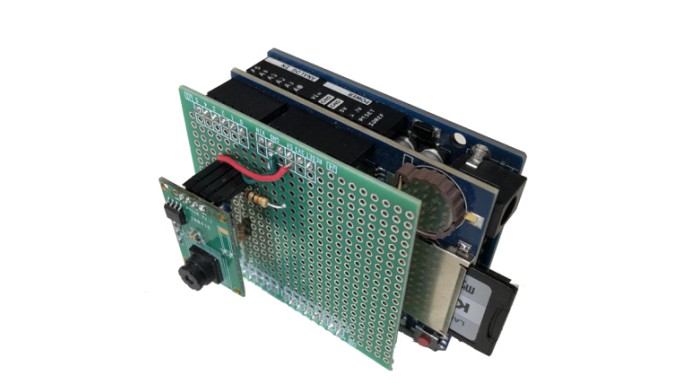
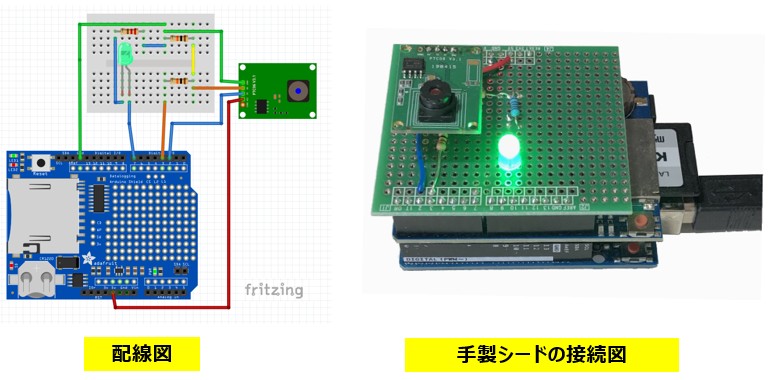
- JPEGカメラ用の手製のシールドPCBを作成する。
- 一定間隔で画像を撮影するスケッチのコードを追加する。
- JPEG画像ファイルの作成時間を設定するスケッチのコードを追加する。
必要な部品・器具は?
| JPEGカメラ | 1個 |
| データ ロガーシールド | 1個 |
| Arduino UNO R3 | 1個 |
| 抵抗 [10KΩ] (秋月電子通商のjpegカメラの部品に付属していました。) | 2個 |
| 手作りシールド用PCB (秋月電子通常でArduino UNO用のPCBを購入) | 1個 |
| 抵抗 220Ω : LEDの電流制限抵抗 | 1個 |
| LED (データ保存中の表示) | 1個 |
JPEGカメラ用のシールドPCBを作りました
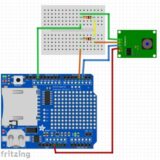
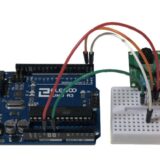
- JPEGカメラをブレッドボードを介してArduino UNO R3に接続していますが、カメラがきちんと固定されていないので長時間撮影向きではありません。実際の配線をワイヤー接続でなく、手作りシールドPCBのスロットにjpegカメラを取り付けて接続する方法に変更します。Arduino UNO R3に接続して横置きにすれば上下左右が正しくなるようにjpegカメラを取り付けています。これで撮影時にテーブルの上に置いても安定します。バッテリー駆動で野外で撮影してもそんなにブレないだろうと目論んでいます。
- ArduinoをPCに接続している場合はシリアルモニタの表示でデータをSDカードに書き込み中であるかどうかが解ります。しかしArduino単体で使う場合はデータをSDカードに保存中かどうかが解りません。データ保存中に電源を止めるとSDカードを壊してしまうかもしれません。データ保存中にLEDを点灯して保存中であることを表示するようにしました。
スケッチに使用するライブラリの入手先
- スケッチで使用する、RTC(実時間)モジュール用のライブラリ(DS3231.h、DS3231.cpp)は[GitHub – jarzebski/Arduino-DS3231: DS3231 Real-Time-Clock]から取得しインストールしてください。
- Arduno用のDS3231用のライブラリは何種類かが公開されていますが、この記事で使用しているライブラリは上記のライブラりであり、異なるライブラリを使用するとコンパイル時にエラーが発生します。
- GitHubでライブラリをダウンロードする
- 対象ライブラリのGitHubページを開く
- 緑色の Code ボタンをクリック (リストの右上にある[<>Code▼]のボタンです。)
- Download ZIP を選択
- ZIPファイルがPCに保存される
- ※「Source code (zip)」でもOKですが、基本は上の手順で問題ありません。
- Arduino IDEにZIPライブラリをインストールする (Arduino IDE 1.x / 2.x 共通)
- Arduino IDE を起動
- メニューから
- スケッチ → ライブラリをインクルード → .ZIP形式のライブラリをインストール
- 先ほどダウンロードした ZIP ファイルを選択
- IDE が自動的に展開してインストール完了
- インストール確認
- メニューのスケッチ → ライブラリをインクルード
- 一覧の「インストール済み」セクションにライブラリ名が表示されていれば成功
- 注意点(特にGitHub系でよくある)
- ZIPの中にさらにフォルダ階層があるとIDEが認識しないことがある
→ libraryname/libraryname/*.h のように二重構造になっていないか確認 - src フォルダがあるタイプはそのままでOK
- リリースページに「Arduino用に整えたZIP」がある場合はそちらを使うと確実
- ZIPの中にさらにフォルダ階層があるとIDEが認識しないことがある
RTC(実時間)モジュールに時間を書き込む
- SDデータロガーシールドのRTC(実時間)モジュールは初期状態では時刻データを保持していません。時刻データ保持用のバッテリーを挿入して時刻を書き込みます。
////////////////////////////////////////////////////////
// RTC(実時間)モジュールの時間設定を行い、時間を画面へ表示する
////////////////////////////////////////////////////////

//ライブラリインクルード
#include <Wire.h>
#include <DS3231.h>

//実時間モジュール設定
DS3231 clock;
RTCDateTime dt;

//一般変数
int i;

void setup()
{
  Serial.begin(9600);

  //実時間モジュールの初期化
  Serial.println("Initialize RTC module");
  // Initialize DS3231
  clock.begin();

  // スケッチのコンパイル時の時刻をRTCモジュールに書き込む
  clock.setDateTime(__DATE__, __TIME__);

  dt = clock.getDateTime();

  //一般変数の初期化
  i=0;

  delay(1000);

  //シリアルログの最初の行に表示項目を表示する
  Serial.print("Count,");
  Serial.print("Year,");
  Serial.print("Month,");
  Serial.print("Day,");
  Serial.print("Hour,");
  Serial.print("Minuts,");
  Serial.println("Second,");

  //シリアルログの表示
  dt = clock.getDateTime();
  Serial.print(i);   Serial.print(",");
  Serial.print(dt.year);   Serial.print(",");
  Serial.print(dt.month);  Serial.print(",");
  Serial.print(dt.day);    Serial.print(",");
  Serial.print(dt.hour);   Serial.print(",");
  Serial.print(dt.minute); Serial.print(",");
  Serial.println(dt.second);
}

void loop()
{
  // loopでは何もしない
}- RTC(実時間)モジュールに時刻が書き込まれたのでファイルに日付データを設定する準備ができました
一定間隔で画像を撮影するスケッチ
// =============================================
// AdafruitのスケッチにLEDを点灯する機能を追加
// =============================================

#include <Adafruit_VC0706.h>
#include <SoftwareSerial.h>
#include <SPI.h>
#include <SD.h>
#include <Wire.h>
#include <DS3231.h>

// SoftwareSerial
SoftwareSerial cameraconnection(2, 3);

//カメラの設定
Adafruit_VC0706 cam = Adafruit_VC0706(&cameraconnection);

//SDカードのChipselectポートの設定
#define chipSelect 10

//SDカードのデータ保存中LED
#define StoringLED 7

//実時間モジュール設定
DS3231 clock;
RTCDateTime dt;

//ファイル作成・更新時のタイムスタンプの設定
char timestamp[30];

// call back for file timestamps
void dateTime(uint16_t *date, uint16_t *time) {
 sprintf(timestamp, "%02d:%02d:%02d %2d/%2d/%2d \n",dt.hour,dt.minute,dt.second,dt.month,dt.day,dt.year-2000);
 // return date using FAT_DATE macro to format fields
 *date = FAT_DATE(dt.year,dt.month,dt.day);
 // return time using FAT_TIME macro to format fields
 *time = FAT_TIME(dt.hour,dt.minute,dt.second);
}

//------------------------------------------------------------------------------

void setup() {

  //SDデータ保存中LED
  pinMode(StoringLED, OUTPUT);
  digitalWrite(StoringLED, LOW);

  // Chipselect ピンモードの設定
  pinMode(10, OUTPUT);

  //実時間モジュールの初期化
  Serial.println("Initialize RTC module");
  // Initialize DS3231
  clock.begin();

  //ここでスケッチのコンパイル時の時刻をRTCモジュールに書き込むことも可能
  //コメントアウトするとコンパイル時の時刻をRTCモジュールに書き込む
  //次にコメントアウトしてスケッチを再度書き込むとRTCモジュールに時刻は残る
  //clock.setDateTime(__DATE__, __TIME__);

  Serial.begin(9600);
  Serial.println("VC0706 Camera snapshot test");

  //SDカードの起動
  if (!SD.begin(chipSelect)) {
    Serial.println("Card failed, or not present");
    // don't do anything more:
    return;
  }

  //jpeg カメラの起動
  if (cam.begin()) {
    Serial.println("Camera Found:");
  } else {
    Serial.println("No camera found?");
    return;
  }

  // jpeg カメラのバージョンの表示
  char *reply = cam.getVersion();
  if (reply == 0) {
    Serial.print("Failed to get version");
  } else {
    Serial.println("-----------------");
    Serial.print(reply);
    Serial.println("-----------------");
  }

  // jpeg カメラの画像サイズの設定
  cam.setImageSize(VC0706_640x480);

  // peg カメラの画像サイズはjpegカメラから読み取ることも可能
  uint8_t imgsize = cam.getImageSize();
  Serial.print("Image size: ");
  if (imgsize == VC0706_640x480) Serial.println("640x480");
  if (imgsize == VC0706_320x240) Serial.println("320x240");
  if (imgsize == VC0706_160x120) Serial.println("160x120");

  //ファイル作成・更新時のタイムスタンプを記録する------------------------------
  SdFile::dateTimeCallback(dateTime);
  sprintf(timestamp, "%02d:%02d:%02d %2d/%2d/%2d \n",dt.hour,dt.minute,dt.second,dt.month,dt.day,dt.year-2000);
  //------------------------------------------------------------------------------

  Serial.println("Snap in 3 secs...");
  delay(3000);

}

void loop() {

  int j;
  //実時間取得
  dt = clock.getDateTime();

  if (! cam.takePicture())
    Serial.println("Failed to snap!");
  else
    Serial.println("Picture taken!");

  // データファイル名を決める。IMGE-000.JPGを基本とし3桁の数字で決める。
  // 保存しているデータを確認し、次の番号のファイルを作成する
  char filename[13];
  strcpy(filename, "IMGE-000.JPG");
  for (int i = 0; i < 1000; i++) {
    filename[5] = '0' + i/100;
    j = i/100;
    j = i - 100*j;
    filename[6] = '0' + j/10;
    filename[7] = '0' + j%10;
    // create if does not exist, do not open existing, write, sync after write
    if (! SD.exists(filename)) {
      break;
    }
  }

  // ファイルにデータを書き込む。書き込み中はLEDを点灯する
  //jpegのデータサイズを読みだし、32バイトごとに読み込む

  File imgFile = SD.open(filename, FILE_WRITE);
  digitalWrite(StoringLED, HIGH);

  // Get the size of the image (frame) taken
  uint16_t jpglen = cam.frameLength();
  Serial.print("Storing ");
  Serial.print(jpglen, DEC);
  Serial.print(" byte image.");

  int32_t time = millis();

  // Read all the data up to # bytes!
  byte wCount = 0; // For counting # of writes
  while (jpglen > 0) {
    // read 32 bytes at a time;
    uint8_t *buffer;
    uint8_t bytesToRead = min((uint16_t)32, jpglen); // change 32 to 64 for a speedup but may not work with all setups!
    buffer = cam.readPicture(bytesToRead);
    imgFile.write(buffer, bytesToRead);
    if(++wCount >= 64) { // Every 2K, give a little feedback so it doesn't appear locked up
      Serial.print('.');
      wCount = 0;
    }
    //Serial.print("Read ");  Serial.print(bytesToRead, DEC); Serial.println(" bytes");
    jpglen -= bytesToRead;
  }
  imgFile.close();
  digitalWrite(StoringLED, LOW);

  time = millis() - time;
  Serial.println("done!");
  Serial.print(time); Serial.println(" ms elapsed");

  //jpegカメラをリセットし、次の撮影を可能とする
  //撮影間の時間を設定する
  Serial.println("camera reset and wait.");
  cam.reset();
  delay(5000);
  Serial.println("camera reset done.");

}
- [ArduinoでJPEGカメラ画像をSDカードに保存する方法]では、Adafruit社のJPEGカメラ用のスケッチ[Snapshot.ino]を参考しました。撮影を1回行って画像データをsetup()でSDカードに保存しています。一定間隔で画像を撮影し画像データをSDカードに保存し続けるためにloop()に移動しました更します。
- 保存したjpeg画像ファイルのタイムスタンプは適当な日時を設定しないと[20001/01/01 1:00]になります。データロガーシードにはRTC(実時間)モジュールが実装されているので時計機能があります。この時間データを、タイムスタンプに実装します。Adafruit社のjpegカメラ用のスケッチ[Snapshot.ino]を編集・追加して作成しています。
まとめ
- 一定間隔で画像を撮影しSDカードに保存する方法を学習しました。一定間隔で観察するときなどに使えそうです。
(参考) 関連する記事は?
- [jpegカメラで屋外の風景を撮影をしました] — 作成したjpegシールドを使って野外撮影をしました。
- [ArduinoとJPEGカメラを使って画像撮影する方法] — jpegカメラで撮影してPCで画像を確認する方法をまとめています。
- [ArduinoでJPEGカメラ画像をSDカードに保存する方法] — SDカードに撮影した画像を記録する方法をまとめています。
ご質問、誤植の指摘などありましたら。「問い合わせ 」のページからお願いします。